EDUDOTNET

Thursday, June 27, 2013

Visual Studio 2013 Preview Highlights

Amazing apps start with Visual Studio 2013 

Get Visual Studio 2013 Preview to try the tools and services you need to create amazing apps that will exceed everyone's expectations.

Visual Studio 2013 Preview Highlights


1. Open VS 13 first time - follow bellow steps....
a.


b. Choose your default environment and VS color theme


c. Preparing VS for first time


d. looks like below after open


2. Create New Project VS 13 Pre

a. Open VS 13 & Click on "New Project" under Start section in left pane


b. After that open a dialog box & select a project type (Web/Windows etc.) and select project location and write project name than click on OK button


c. After that open a dialog box & select a template for ASP.Net Project and set "Configure Authentication" & Click on "Create Project" button.


d. Created New Project with VS 13 and you can see solution explorer.....


e. Run you application its looking pretty good with new theme using bootstrap lib....


                    ~Enjoying with VS 2013 Preview~

Tuesday, May 28, 2013

IIS URL Rewriting and ASP.NET Routing

Monday, April 29, 2013

ASP.NET MVC: DROPDOWNLIST WITH ENUM


Create Drop-down list with enum values in MVC:


Inside model we need to define:
    1. a property of enum type.
    2. a property of SelectedListItem as IEnumerable.
    3. Inside constructor filling Dropdown list from enum.
ASP.NET MVC: DROPDOWNLIST WITH ENUM
Model
Enum (County list):
ASP.NET MVC: DROPDOWNLIST WITH ENUM
Enum

Action (Creating object of model and return model):
ASP.NET MVC: DROPDOWNLIST WITH ENUM
Action

View (Calling mode on top and filling dropdown list)
ASP.NET MVC: DROPDOWNLIST WITH ENUM
View


Sunday, April 28, 2013

ROUTING IN ASP.NET MVC

URL Routing in MVC
URL Routing:-

Generally, URL Routing/Rewiring is a URL pattern matching system that monitor the browser request and heck out what to do with that browser request. The Routing module is responsible for mapping incoming browser requests to particular ASP.NET MVC controller actions. We can to make very pretty URLs more flexible. We can create "Route Table" inside the application`s "Global.asax" file.

Routing system divided in two part:-
  1. RouteData: This Technic is used to investigate an incoming URL and then check which controller and action the request is need to be send.
  2. VirtualPath: This Technic is responsible for generating Outbound URL. These are the URLs that appear in the HTML rendered from our views so that a specific action will be invoked when the user clicks the link. 

Sample Code:-
           //Default url
            routes.IgnoreRoute("{resource}.axd/{*pathInfo}");
            routes.MapRoute(
                "Default",
                "",
                new { controller = "Home", action = "Index", id = "" }
            );
            //others URL rewriting you want
            routes.MapRoute(null,
                "Search/{City_State}/{ID}",
                new { controller = "Home", action = "Search" }
                );
When the routing module finds a exact in the route table for the incoming browser request's URL, it forwards the request to the suitable controller and action.


Thursday, April 25, 2013

Generate a CSR (Certificate Signing Request) : IIS 7

How generate a Certificate Signing Request (CSR) in IIS7


  1. Open IIS(Internet Information Services)
    1. On the Start menu, click All Programs, click Accessories, and then click Run.
    2. In the Open dialog box, type inetmgr and then click OK.
  2. See the below IIS window 
    1. After that you can find "Server Certificate" Under IIS section from the center menu section and double click on this. You can highlighted with square border.
  3. After double click you see below window and go to right pane under "Action" menu and click on "Create Certificate Request" (highlighted) in this screenshot.
  4. Enter the Distinguished Name information in the Distinguished Name Properties window 
  5. Click on Next button
  6. In the "Cryptographic Service Prover Properties" window, select cryptographic service provider "Microsoft RSA SChannel Cryptographic Provider" from dropdown list and select "Bit length"  "2048" from dropdown list and click on Next button
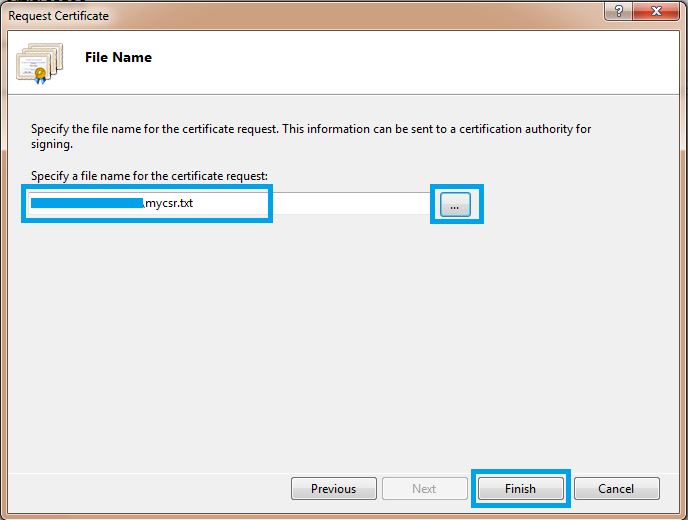
  7. Enter the location and file of CSR or Choose location using browse button near textbox.  After click on FINISH button
  8. You can find CSR txt file in your exact location and open the file and you can see CSR code between  ----CERTIFICATE REQUEST---- and ----END CERTIFICATE REQUEST---- 
  9. You can copy the code and page into online request form.

Saturday, December 29, 2012

Create Simple Window Service And Setup Project With Installation

Create Simple Window Service
Open Visual Studio 10 go to File > New > Project, open a dialog box and new project as a “Window Service” and on OK button.
   Add New Project   

   Select Project Type

After created project you can see service design page like below and click on link “click here to switch to code view”


Solution Explorer look like this:     


WinService.cs class should  contains  two functions OnStart() & OnStop() & contain below code:-   public partial class WinService : ServiceBase
    {
        public WinService()
        {
            InitializeComponent();
        }
        protected override void OnStart(string[] args)
        {
             //
        }
        protected override void OnStop()
        {
            //
        }
    }


Go to solution explorer and right click on WinService.cs  go to view designer  look design view after that right click on design page and click on “add installer” look like this:


After added ProjectInstaller.cs and you have 2 components on the design view of the ProjectInstaller.cs (serviceProcessInstaller1 and serviceInstaller1). You should then setup the properties as you need.: 
       >Click on serviceinstaller1 and go to property right pane and edit service name Service1 to WinService, look like:


         >Click on serviceProcessInstaller1 and go to property right pane and select account & choose LocalService from dropdown and save. See below:


You have two assemblies under references see below highlighted 1.  System.Configuration.Install  2.  System.ServiceProcess. 


Create Setup Project

Build your service project, you need to Setup project to install the build/compiled project and run the installers to run the Windows service. Create a new project as a “Setup Project”  and need to add project output :-
Create Setup Project for Window Service
Go to solution explorer & right click on solution, go to Add > New Project…


Open a dialog box, go to left pane under template > Other Project Type > Setup and Deployment > Visual Studio Installer and go to  right pane select project as a “Setup Project” and click on OK button.


Custom actions add to setup project. 
Go to solution, right click on setup project > View > Custom action.


Appears “Custom action” editor.
Right click on “Custom action > Add Custom action… ”


Open a dialog box “Select Item In Project” : Double click on “Application Folder” after that click on “Add Output…” button. Open a dialog box, choose your project (Window service) and “Primary Output” from (Active) and click on OK button.


   Build your setup project and install the window service

Install And Start The Service

Go to solution explorer > Build both project (Window Service & Setup Project) > Right Click on Setup Project and Click on Install Option > and follow setup wizard steps. Finally your service ready for start & stop. If you window server than go to – Start > Administrator tools > Service > Find Your Service > Right Click on Service Name > Start.  Otherwise – Start > Computer (My Computer) > Manage  > Click on Service And Application from left pane > Services.  


Friday, December 28, 2012

.Net Or .Net Framework


It is Microsoft Technology and complete environment for developers to develop, run and deploy the applications. It is a programming framework that provides both integrated development and an uniform run-time environment. Its contains(supports) multiple languages & multiple applications.
Following languages:
  1. C#
  2. VB
  3. VC++
  4. F#
  5. Etc...
Applications:
  1. Window Form application
  2. Console application
  3. Web applications(asp.net, asp.net mvc)
  4. Window serives
  5. WCF application
  6. WPF application
  7. Etc.....